- 一.引入依赖
- 二.编写Swagger2的配置类
- 三.Swagger2在Controller中的使用
- 四.Swagger2在model中的使用
- 五.在启动类中完善注解
- 六. 启动项目进行测试
在 thc-videos-dev-common 模块中,引入swagger2的依赖
     io.springfox
     springfox-swagger2
     2.4.0


     io.springfox
     springfox-swagger-ui
     2.4.0
在thc-videos-dev-mini-api 模块中, 编写swagger2的配置类 在此配置类中,主要配置Controller的扫描包路径, 以及接口文档的作者联系信息等
package com.thc;

import org.springframework.context.annotation.Bean;
import org.springframework.context.annotation.Configuration;
import springfox.documentation.builders.ApiInfoBuilder;
import springfox.documentation.builders.PathSelectors;
import springfox.documentation.builders.RequestHandlerSelectors;
import springfox.documentation.service.ApiInfo;
import springfox.documentation.service.Contact;
import springfox.documentation.spi.DocumentationType;
import springfox.documentation.spring.web.plugins.Docket;
import springfox.documentation.swagger2.annotations.EnableSwagger2;

/**
 * 类名称:Swagger2
 * 类描述:swagger2的配置类
 *
 * @author: taohongchao
 * 创建时间:2019/6/2 14:42
 * Version 1.0
 */
@Configuration
@EnableSwagger2
public class Swagger2 {

    /**
     * 方法名: createRestApi
     * 方法描述:  swagger的扫描Controller包配置
     * 修改日期: 2019/6/2 14:46
      * @param
     * @return springfox.documentation.spring.web.plugins.Docket
     * @author taohongchao
     * @throws
     */
    @Bean
    public Docket createRestApi(){
        return new Docket(DocumentationType.SWAGGER_2).apiInfo(apiInfo()).select()
                .apis(RequestHandlerSelectors.basePackage("com.thc.controller"))
                .paths(PathSelectors.any()).build();
    }

    /**
     * 方法名: apiInfo
     * 方法描述:  编写接口文档的相关信息
     * 修改日期: 2019/6/2 14:50
      * @param
     * @return springfox.documentation.service.ApiInfo
     * @author taohongchao
     * @throws
     */
    private ApiInfo apiInfo(){
        return new ApiInfoBuilder()
                //页面的标题
                .title("微信小程序短视频接口文档")
                //联系人
                .contact(new Contact("java持续实践", "https://blog.csdn.net/qq_33229669", "xxx@163.com"))
                //接口文档的描述
                .description("欢迎访问短视频接口文档")
                //定义版本号
                .version("1.0").build();
    }
}
修改上一节中,用户注册的Controller, 使其增加Swagger的相关信息
在Controller类的上方,增加了如下的注解, tags用于在接口页面中显示说明此Controller的作用. @Api(value = "用户注册登录的接口",tags = {"注册和登录的Controller"}) 实际显示的效果如下图  在接口的方法上增加如下的注解, 其中notes用于显示说明该接口的用途
 @ApiOperation(value = "用户注册",notes = "用户注册的接口") 显示的效果如图 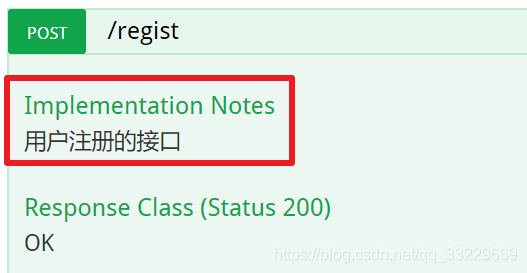
package com.thc.controller;

import com.thc.pojo.Users;
import com.thc.service.UserService;
import com.thc.utils.JSONResult;
import com.thc.utils.MD5Utils;
import io.swagger.annotations.Api;
import io.swagger.annotations.ApiOperation;
import org.apache.commons.lang3.StringUtils;
import org.springframework.beans.factory.annotation.Autowired;
import org.springframework.web.bind.annotation.PostMapping;
import org.springframework.web.bind.annotation.RequestBody;
import org.springframework.web.bind.annotation.ResponseBody;
import org.springframework.web.bind.annotation.RestController;

/**
 * 类名称:RegistLoginController
 * 类描述:用户注册的Controller
 *
 * @author: taohongchao
 * 创建时间:2019/6/2 11:35
 * Version 1.0
 */
@RestController
@Api(value = "用户注册登录的接口",tags = {"注册和登录的Controller"})
public class RegistLoginController {

    @Autowired
    private UserService userService;

    /**
     * 方法名: regist
     * 方法描述:  用户注册的方法
     * 修改日期: 2019/6/2 11:37
      * @param user
     * @return com.thc.utils.JSONResult
     * @author taohongchao
     * @throws
     */
    @ApiOperation(value = "用户注册",notes = "用户注册的接口")
    @PostMapping("/regist")
    public JSONResult regist(@RequestBody Users user) throws Exception {
        //1. 判断用户名和密码必须不为空
        if (StringUtils.isBlank(user.getUsername()) || StringUtils.isBlank(user.getPassword())) {
            return JSONResult.errorMsg("用户名和密码不能为空");
        }

        //2. 判断用户名是否存在
        boolean usernameIsExist = userService.queryUsernameIsExist(user.getUsername());

        //3. 保存用户, 注册信息
        if (usernameIsExist) {
            //用户名存在 , 提示错误信息给用户
            return JSONResult.errorMsg("该用户名已经存在, 请换一个再试");

        } else {

            //用户名信息不存在, 保存注册信息
            user.setNickname(user.getUsername());

            // 把用户密码进行md5 加密
            user.setPassword(MD5Utils.getMD5Str(user.getPassword()));

            //初始化参数信息
            user.setFansCounts(0);
            user.setReceiveLikeCounts(0);
            user.setFollowCounts(0);

            userService.saveUser(user);
        }
        return JSONResult.ok();
    }
}
在model中使用Swagger2的注解,用于规定哪些参数是必须传递的. 在model类上使用如下的注解,用于说明该model的用途. @ApiModel(value = "用户对象",description = "这是用户对象")  在用户名和密码的属性上,加上了如下的注解,用于给出该属性的中文名称, 传递参数的示例,其中
required = true代表该参数是必填的. @ApiModelProperty(value = "用户名",name = "username",example = "username",required = true)
package com.thc.pojo;

import io.swagger.annotations.ApiModel;
import io.swagger.annotations.ApiModelProperty;

import javax.persistence.*;

@ApiModel(value = "用户对象",description = "这是用户对象")
public class Users {
    @Id
    // hidden为true代表为在接口文档中 不显示此属性
    @ApiModelProperty(hidden = true)
    private String id;

    /**
     * 用户名  required = true 代表为必填项
     */
    @ApiModelProperty(value = "用户名",name = "username",example = "username",required = true)
    private String username;

    /**
     * 密码
     */
    @ApiModelProperty(value = "密码",name = "password",example = "password",required = true)
    private String password;

    /**
     * 我的头像,如果没有默认给一张
     */
    @Column(name = "face_image")
    @ApiModelProperty(hidden = true)
    private String faceImage;

    /**
     * 昵称
     */
    private String nickname;

    /**
     * 我的粉丝数量
     */
    @Column(name = "fans_counts")
    @ApiModelProperty(hidden = true)
    private Integer fansCounts;

    /**
     * 我关注的人总数
     */
    @Column(name = "follow_counts")
    @ApiModelProperty(hidden = true)
    private Integer followCounts;

    /**
     * 我接受到的赞美/收藏 的数量
     */
    @Column(name = "receive_like_counts")
    @ApiModelProperty(hidden = true)
    private Integer receiveLikeCounts;

    /**
     * @return id
     */
    public String getId() {
        return id;
    }

    /**
     * @param id
     */
    public void setId(String id) {
        this.id = id;
    }

    /**
     * 获取用户名
     *
     * @return username - 用户名
     */
    public String getUsername() {
        return username;
    }

    /**
     * 设置用户名
     *
     * @param username 用户名
     */
    public void setUsername(String username) {
        this.username = username;
    }

    /**
     * 获取密码
     *
     * @return password - 密码
     */
    public String getPassword() {
        return password;
    }

    /**
     * 设置密码
     *
     * @param password 密码
     */
    public void setPassword(String password) {
        this.password = password;
    }

    /**
     * 获取我的头像,如果没有默认给一张
     *
     * @return face_image - 我的头像,如果没有默认给一张
     */
    public String getFaceImage() {
        return faceImage;
    }

    /**
     * 设置我的头像,如果没有默认给一张
     *
     * @param faceImage 我的头像,如果没有默认给一张
     */
    public void setFaceImage(String faceImage) {
        this.faceImage = faceImage;
    }

    /**
     * 获取昵称
     *
     * @return nickname - 昵称
     */
    public String getNickname() {
        return nickname;
    }

    /**
     * 设置昵称
     *
     * @param nickname 昵称
     */
    public void setNickname(String nickname) {
        this.nickname = nickname;
    }

    /**
     * 获取我的粉丝数量
     *
     * @return fans_counts - 我的粉丝数量
     */
    public Integer getFansCounts() {
        return fansCounts;
    }

    /**
     * 设置我的粉丝数量
     *
     * @param fansCounts 我的粉丝数量
     */
    public void setFansCounts(Integer fansCounts) {
        this.fansCounts = fansCounts;
    }

    /**
     * 获取我关注的人总数
     *
     * @return follow_counts - 我关注的人总数
     */
    public Integer getFollowCounts() {
        return followCounts;
    }

    /**
     * 设置我关注的人总数
     *
     * @param followCounts 我关注的人总数
     */
    public void setFollowCounts(Integer followCounts) {
        this.followCounts = followCounts;
    }

    /**
     * 获取我接受到的赞美/收藏 的数量
     *
     * @return receive_like_counts - 我接受到的赞美/收藏 的数量
     */
    public Integer getReceiveLikeCounts() {
        return receiveLikeCounts;
    }

    /**
     * 设置我接受到的赞美/收藏 的数量
     *
     * @param receiveLikeCounts 我接受到的赞美/收藏 的数量
     */
    public void setReceiveLikeCounts(Integer receiveLikeCounts) {
        this.receiveLikeCounts = receiveLikeCounts;
    }
}
此步骤为项目中的配置, 与Swagger2无关 . 其中要注意@MapperScan的注解要使用tk包下的,否则项目会报错.
package com.thc;

import org.springframework.boot.SpringApplication;
import org.springframework.boot.autoconfigure.SpringBootApplication;
import org.springframework.context.annotation.ComponentScan;
import tk.mybatis.spring.annotation.MapperScan;

/**
 * 类名称:Application
 * 类描述:启动类
 *
 * @author:
 * 创建时间:2019/4/18 19:22
 * Version 1.0
 */
@SpringBootApplication
@MapperScan(basePackages = "com.thc.mapper")
@ComponentScan(basePackages = {"com.thc","org.n3r.idworker"})
public class Application {
    public static void main(String[] args){
        SpringApplication.run(Application.class);
    }
}
项目启动后,访问如下的地址 http://localhost:8081/swagger-ui.html 即可看到如下的接口文档  测试用户注册的接口,发送如下的请求.
  响应结果如下 :
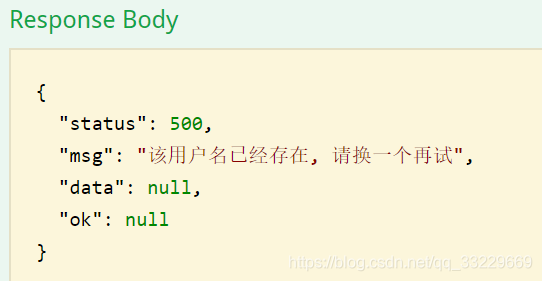
  测试相同的用户名, 返回的信息如下. 代表接口是可用的.