
在Visual Studio 2017中设置React项目
- 下载示例 - 852.4 KB
我过去曾多次在工作要求中找到“React”并在Angular中进行开发,我总是想知道这两个单页应用程序框架有多么不同。好吧,我想我等不及了,在一次面试中,他们让我开发一个简单的React页面。我感到很惊讶,但我们不应该在面试中说“我不能”。
首先要提到的是项目定义,如下所示:使用React创建一个带有汽车零件输入表单的简单单页应用程序。
- 汽车零件表单必须包含以下字段
-
- ID(唯一标识符,可以自动生成)。
- 部件号(从00001开始的随机5位数字)。
- 零件名称(汽车零件名称)。
- 描述(描述汽车部件)。
- 汽车制造商名称(克莱斯勒,道奇,福特等)
-
- 应用程序必须能够将汽车零件条目保存到数据库
- 应用程序必须能够编辑汽车零件条目
- 应用程序必须能够删除汽车零件条目
为了完成项目,我决定使用Visual Studio 2017,并在考虑这些要求的情况下探索React框架。幸运的是,互联网在任何主题中都提供了无数的资源。所以按步骤我进行如下:
创建一个React项目这是任何.NET开发人员都知道的一个步骤。但过程如下:
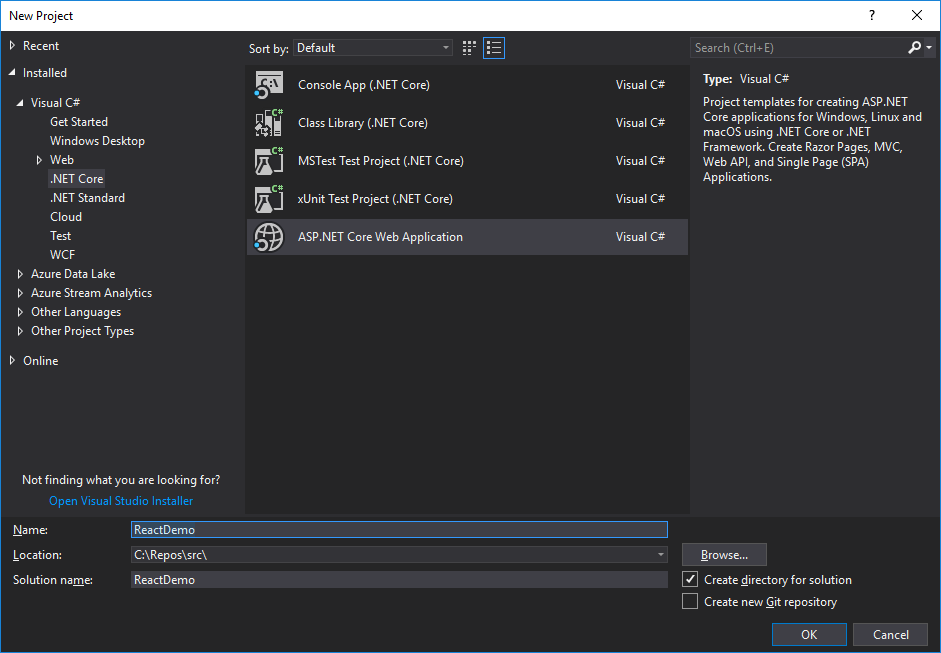
- 打开Visual Studio 2017并选择“创建新项目”。
- 在弹出窗口中选择项目类型,在本例中为ASP.NET Core Web Application。这是.NET Core模板组的一部分。
- 选择项目的文件夹位置,指定项目名称(React Demo)和解决方案名称(React Demo)。
- 检查“创建解决方案目录”选项。
- 如果您有一个GIT帐户,并且您希望将此项目保留在GIT中,那么也要检查该选项。
- 单击确定后,下一个窗口将显示不同的项目模板。选择ReactJS模板,然后单击“确定”。
- 第一个窗口应该是这样的。第二个窗口非常简单,所以我没有在这里显示它,但它需要选择ReactJS选项并单击确定。
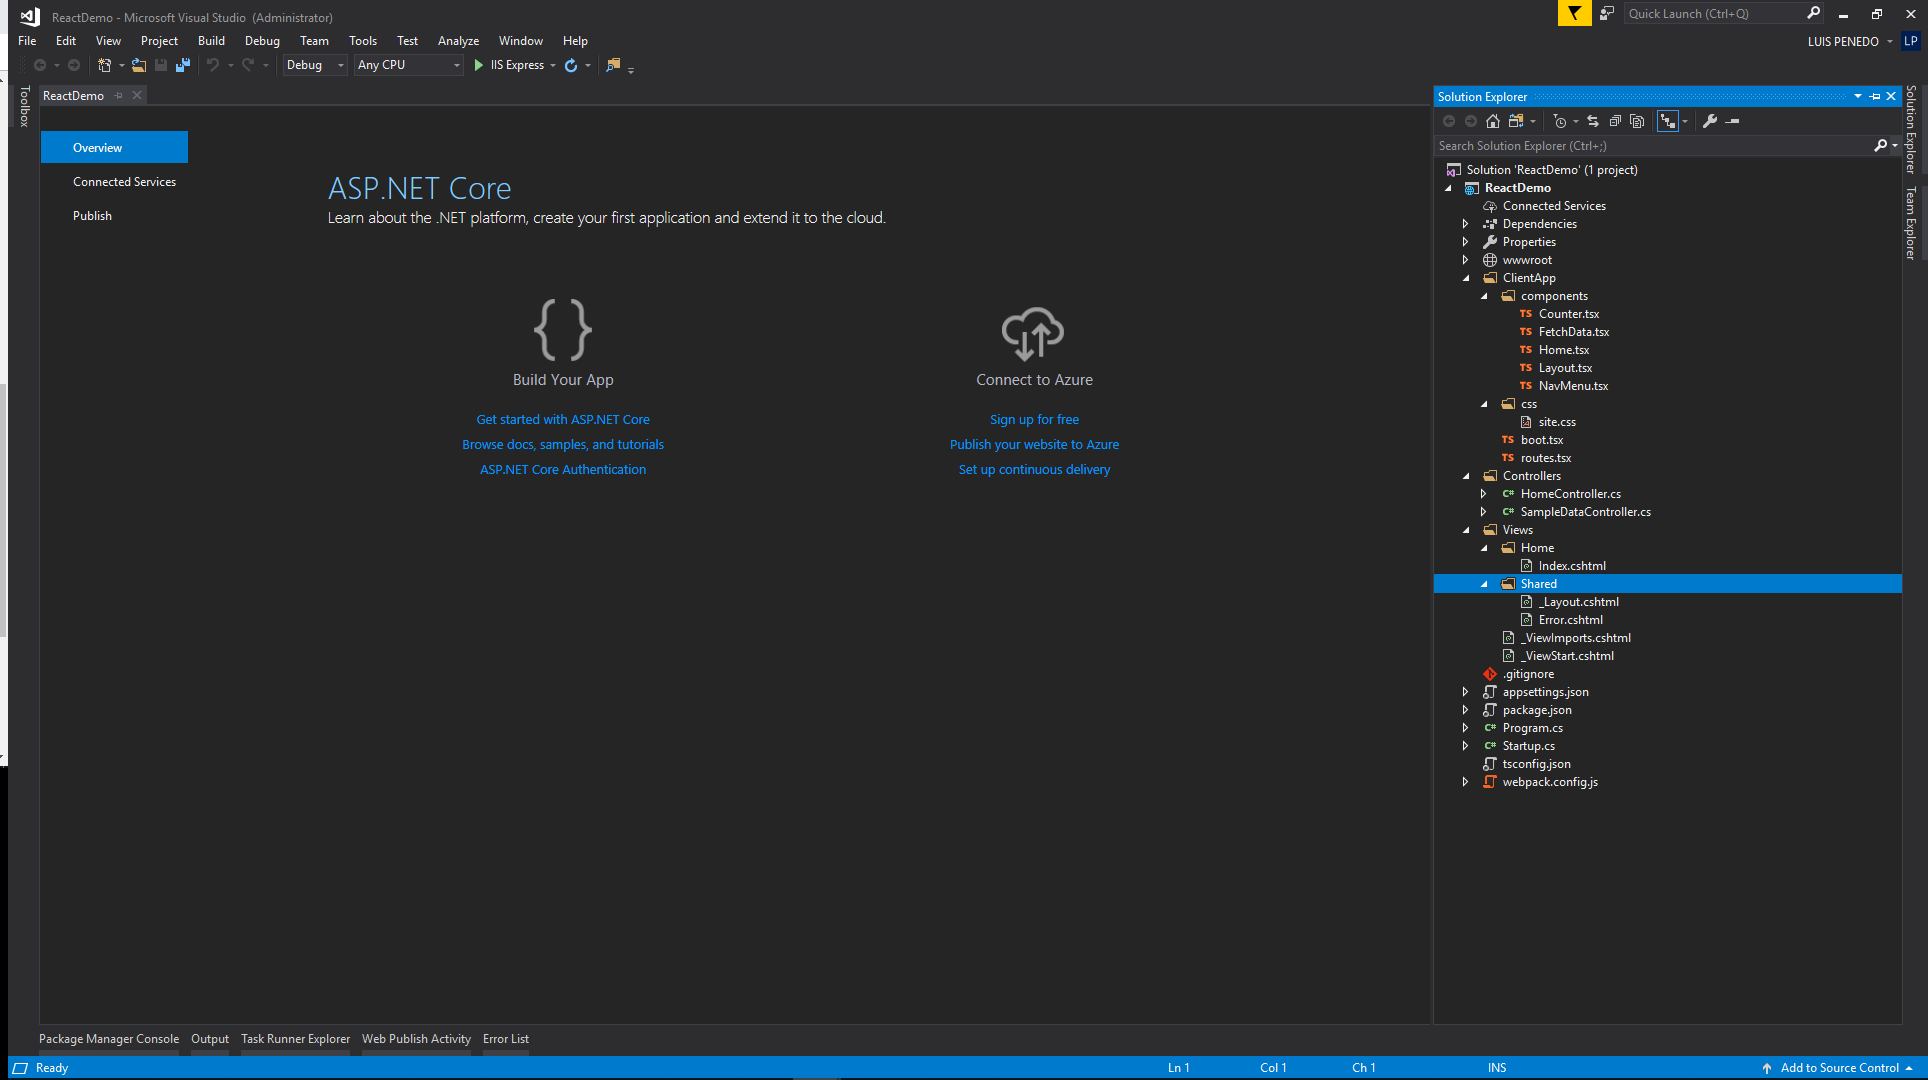
解决方案资源管理器将是这样的:
这是我们在运行项目时得到的:
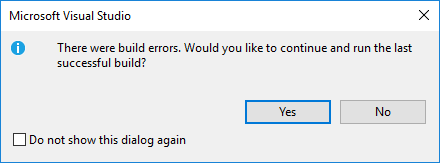
好吧!一个错误。如果我们选择项目名称并单击“显示所有文件”,我们将注意到没有node_modules文件夹。因此,我们的第一步是在项目文件级别打开命令提示符并运行NPM Install。第二次我们运行项目...... 搞定了!
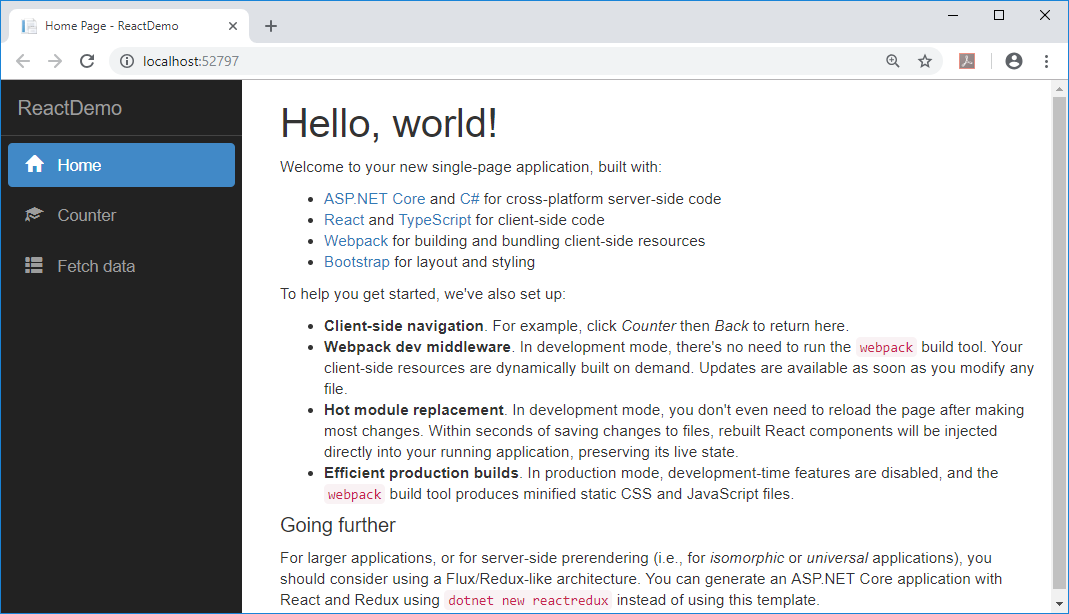
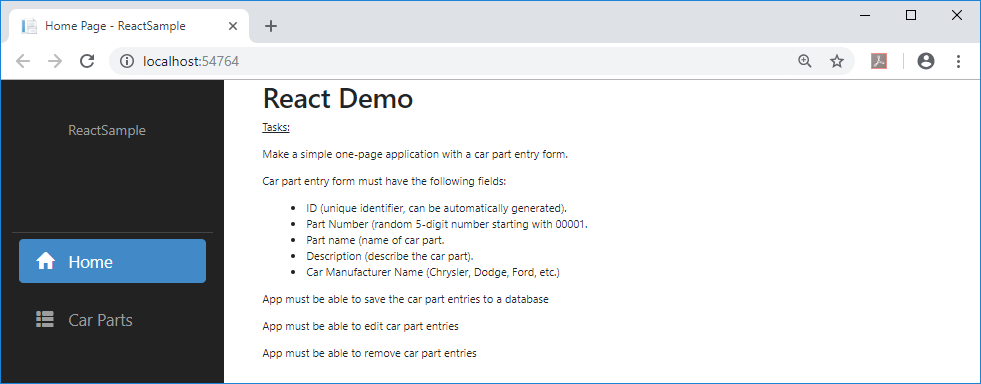
对于一个我们可能不需要的额外内容的项目来说,这是一个很好的起点。在我们的例子中,我们不需要Counter和Fetch Data菜单项和相关页面。我们需要首页,但我们可能需要更改该文本。为了提交React演示,我决定将主页中的文本替换为项目要求。结果将是这样的:
import * as React from 'react';
import { RouteComponentProps } from 'react-router';
export class Home extends React.Component {
public render() {
return
React Demo
Tasks:
Make a simple one-page application with a car part entry form.
Car part entry form must have the following fields:
- ID (unique identifier, can be automatically generated).
- Part Number (random 5-digit number starting with 00001.
- Part name (name of car part.
- Description (describe the car part).
- Car Manufacturer Name (Chrysler, Dodge, Ford, etc.)
App must be able to save the car part entries to a database
App must be able to edit car part entries
App must be able to remove car part entries
;
}
}我还决定删除Counter和Fetch Data并添加React Demo。第一步是一个简单的步骤,只打开Home.tsx文件并替换文本。第二步需要您打开NavMenu.tsx文件。在该文件中删除以下行:
          Counter


          Fetch data
并用以下代码替换它们:
React Demo
同样在routes.tsx文件中删除counter和fetchdata路由,并将其替换为“carpart”路由,如下所示:
import * as React from 'react';
import { Route } from 'react-router-dom';
import { Layout } from './components/Layout';
import { Home } from './components/Home';;
import { CarPart } from './components/ CarPart;
export const routes =


;
我们可以删除Counter.tsx和FetchData.tsx并添加一个新的carPart.tsx。要添加carPart tsx文件,我刚仅添加一个typescript文件,并将其扩展名更改为tsx。以下代码显示了CarPart组件的详细信息。
此组件有两个事件方法HandleSave和HandleDelete,单击相应按钮时会触发这些方法。我们在这些方法中需要注意的是react Fetch的调用。在HandleSave的情况下,它包含头数据并将对象作为头的一部分作为JSON对象传递,这样,在控制器中,SavePartData方法中CarPartModel类型的参数carPart将使用[FromModel]进行修饰,这意味着没有必须映射任何东西来传递和对象实例。
在HandleDelete的情况下,唯一需要的参数是将从数据库中删除的部件ID。
import 'bootstrap/dist/css/bootstrap.min.css';
import * as React from 'react';
import { RouteComponentProps } from 'react-router';
import Link, { LinkedComponent } from 'valuelink';
interface CarPartModel {
ID: number;
PartNumber: number;
PartName: string;
Description: string;
CarManufacturer: string;
}
const carManufacturers = [
{ label: "Ford", value: 1 },
{ label: "Chevrolett", value: 2 },
{ label: "Tesla", value: 3 },
{ label: "Chrysler", value: 4 },
{ label: "Honda", value: 5 },
{ label: "Toyota", value: 6 },
];
export class CarPart extends React.Component {
state: CarPartModel = {
ID: 0,
PartNumber: 0,
PartName: '',
Description: '',
CarManufacturer: ''
};
constructor() {
super();
this.state = {
ID: 0,
PartNumber: 0,
PartName: '',
Description: '',
CarManufacturer: ''
};
this.handleSave = this.handleSave.bind(this);
this.handleDelete = this.handleDelete.bind(this);
}
handleSave = () => {
fetch('api/CarParts/SavePartData', {
method: 'post',
headers: new Headers({
"Content-Type": "application/json",
Accept: "application/json"
}),
body: JSON.stringify(this.state)
}).then(function (response) {
if (response.status !== 200) {
console.log('fetch returned not ok' + response.status);
}
}).catch(function (err) {
console.log(`error: ${err}`);
})
}
handleDelete = () => {
if (!confirm("Do you want to delete employee with Id: " + this.state.ID))
return;
else {
fetch('api/CarParts/Delete/' + this.state.ID, {
method: 'delete'
}).then(data => {
this.state =
{
ID: 0,
PartNumber: 0,
PartName: '',
Description: '',
CarManufacturer: ''
};
});
}
}
public handleIdChange(event: any): void {
this.state.ID = event.target.value;
}
public handlePartNumberChange(event: any): void {
this.state.PartNumber = event.target.value;
}
public handlePartNameChange(event: any): void {
this.state.PartName = event.target.value;
}
public handleDescriptionChange(event: any): void {
this.state.Description = event.target.value;
}
public handleManufacturerChange(event: any): void {
this.state.CarManufacturer = event.target.value;
}
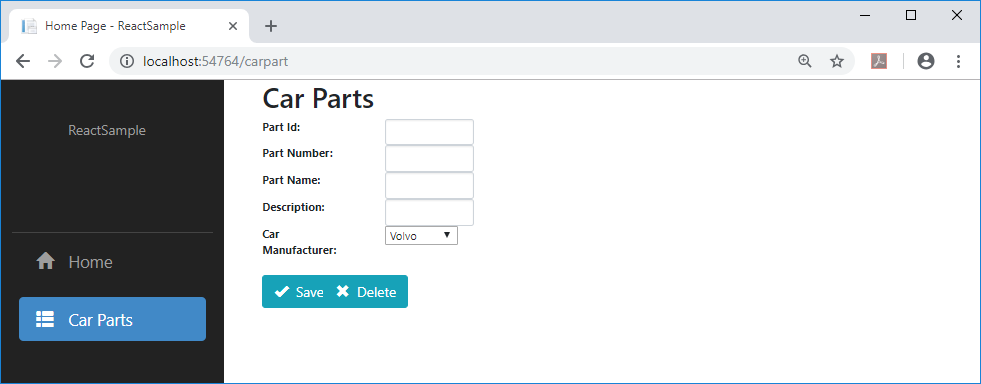
public render() {
return
Car Parts
Part Id:
this.handleIdChange(e)} required />
Part Number:
this.handlePartNumberChange(e)} required />
Part Name:
this.handlePartNameChange(e)} required />
Description:
this.handleDescriptionChange(e)} required />
Car Manufacturer:
this.handleManufacturerChange(e)}>
Volvo
Saab
Mercedes
ChryslerSaab
Dodge
Ford
Save
Delete
;
}
}我添加的最后一项是项目服务。为此,我添加了一个services文件夹,并添加了一个名为CarPartService.cs的类和ICarPartService.cs接口。服务类具有c#中的实际代码,该代码将与数据访问层(DAL)交互以执行CRUD操作。我没有在演示中包含它,因为它超出了项目目的范围,项目目的是显示使用React代码的能力。但是出于测试目的,在服务方法中添加断点并在调试中运行应用程序。
ICarPartInterface.cs的内容如下:
using ReactSample.ViewModels;
using System;
using System.Collections.Generic;
using System.Linq;
using System.Threading.Tasks;
namespace ReactSample.Services
{
   public interface ICarPartService
   {
       CarPartViewModel GetCartPart(int carPartId);
       bool SaveCartPart(CarPartViewModel carPart);
       bool UpdateCarPart(CarPartViewModel carPart);
       bool Delete(int carPartId);
   }
}
CarPartService.cs的代码如下:
using System;
using System.Collections.Generic;
using System.Linq;
using System.Threading.Tasks;
using ReactSample.ViewModels;
namespace ReactSample.Services
{
   public class CarPartsService : ICarPartService
   {
       public bool Delete(int carPartId)
       {
           try
           {
               // Find the car part associated with the given Id and delete it
               return true;
           }
           catch(Exception ex)
           {
               // Log error message in case of error
           }
           return false;
       }
       public CarPartViewModel GetCartPart(int carPartId)
       {
           var carPart = new CarPartViewModel();
           try
           {
               // Find the car part associated with the given Id, polulate carPart object and return it
               return carPart;
           }
           catch (Exception ex)
           {
               // Log error message in case of error
           }
           return null;
       }
       ///
       /// Receives car part object and query database
       /// if record exists then updates
       /// if record does not exist then inserts
       ///
       ///
       ///
       public bool SaveCartPart(CarPartViewModel carPart)
       {
           try
           {
               // Save the car part object into database
               return true;
           }
           catch (Exception ex)
           {
               // Log error message in case of error
           }
           return false;
       }
       public bool UpdateCarPart(CarPartViewModel carPart)
       {
           try
           {
               // Find the car part associated with the given Id and update fields using parameter object
               return true;
           }
           catch (Exception ex)
           {
               // Log error message in case of error
           }
           return false;
       }
   }
}
为了使用服务层,我决定将它注入控制器。所以我在Controllers文件夹中创建了一个CarPartsController并添加了以下代码:
using System;
using System.Collections.Generic;
using System.Linq;
using System.Threading.Tasks;
using Microsoft.AspNetCore.Mvc;
using ReactSample.Services;
using ReactSample.ViewModels;
namespace ReactSample.Controllers
{
   [Produces("application/json")]
   [Route("api/[controller]")]
   public class CarPartsController : Controller
   {
       ICarPartService _carPartService;
       private readonly string[] CarManufacaturers = new[]
       {
           "Chryssler", "Dodge", "Ford", "Jeep", "Chevrolett", "Honda", "Toyota", "Subaru", "Nisan", "Kia"
       };
       public CarPartsController(
           ICarPartService carPartService
       )
       {
           _carPartService = carPartService;
       }
       [HttpGet("{id}", Name = "Get")]
       public CarPartViewModel Get(int id)
       {
           return _carPartService.GetCartPart(id);
       }
       [HttpPost("SavePartData")]
       public void SavePartData([FromBody]CarPartViewModel carPart)
       {
           _carPartService.SaveCartPart(carPart);
       }
       // PUT: api/Sample/5
       [HttpPut("{id}")]
       public void Update(int id, [FromBody]CarPartViewModel carPart)
       {
           _carPartService.UpdateCarPart(carPart);
       }
       // DELETE: api/ApiWithActions/5
       [HttpDelete("Delete/{id}")]
       public void Delete(int id)
       {
           _carPartService.Delete(id);
       }
   }
}
你可以注意到在演示中我在这个控制器中使用了两个方法,SavePartData和Delete。我把了其他方法保留,以防我决定为这个项目添加更多功能......只是为了好玩。如果您注意到此控制器构造函数具有分配给_carPartService变量的carPartService参数。为了完成这项工作,我们需要将以下行添加到Starup.cs文件中,ConfigureServices方法最后将看起来像这样的:
// This method gets called by the runtime. Use this method to add services to the container.
public void ConfigureServices(IServiceCollection services)
{
    services.AddScoped();
    services.AddMvc();
}
添加bootstrap并运行解决方案后,我们得到:
快乐的编码!
原文地址:https://www.codeproject.com/Articles/1271257/React-in-one-day

