
OAuth是 Open Authorization的简写。 OAuth协议为用户资源的授权提供了一个安全的、开放而又简易的标准(开放授权标准)。 它允许用户授权第三方应用访问他们存储在另外的服务提供者上的信息,而不需要将用户名和密码提供给第三方应用或分享他们数据的所有内容。
与以往的授权方式不同之处是 OAuth的授权不会使第三方触及到用户的帐号信息(如用户名与密码),即第三方无需使用用户的用户名与密码就可以申请获得该用户资源的授权,因此 OAuth是安全的。
Oauth协议目前发展到 2.0版本,1.0版本过于复杂,2.0版本已得到广泛应用。 OAuth2.0是 OAuth协议的延续版本,但不向后兼容 OAuth 1.0(即完全废止了 OAuth1.0)。
1.2 OAuth2.0协议包含的角色- 资源所有者(Resource Owner): 能够授予对受保护资源的访问权限的实体。通常是用户(user),也可以是应用程序,即该资源的拥有者。
- 认证服务器(Authorization server): 又称为授权服务器,认证成功后会给客户端发放令牌(),作为客户端访问资源服务器的凭据。 服务器认证成功后向客户端颁发访问令牌(access_token),作为客户端访问资源服务器的凭据,并验证资源所有者并获得授权。 简单点说就是登录功能,用于服务提供者对资源拥有的身份进行认证,对访问资源进行授权。
- 资源服务器(Resource server) 托管受保护资源的服务器,能够接受并使用访问令牌响应受保护的资源请求。
- 第三方应用程序(Third-party application): - 示例中的浏览器、微信客户端 又称为客户端(client),本身不存储资源,需要通过资源拥有者的授权去请求资源服务器的资源。
OAuth2定义了四种授权方式,其实是代表了OAuth授权三方的不同互信程度。 四种授权模式(authorization grant):
- Authorization code Grant:授权码模式,推荐使用
- Implicit Grant:隐藏/简化模式,不推荐使用
- Resource Owner Password Credentials Grant:密码模式
- Client Credentials Grant:客户端模式

Spring 官方对于 OAuth2.0 的解释:
Spring Security OAuth 项目已弃用。Spring Security 提供了最新的 OAuth 2.0 支持。有关 OAuth2.0 的支持已经集成到了 Spring Security 里面了。
关于 Security OAuth2 重构说明,查看参考文章或者Spring官网。
参考文章:
- Spring官网:https://projects.spring.io/spring-security-oauth/docs/oauth2.html
- Spring Security 与 Oauth2.0:https://www.jianshu.com/p/e3d814ad4de0
- Oauth百度百科:https://baike.baidu.com/item/oAuth/7153134?fr=aladdin
- Oauth协议:https://datatracker.ietf.org/doc/html/rfc6749
Security OAuth2依赖傻傻分不清,目前:
spring-security-oauth2  -> 被废弃,建议不使用,否则后期无法维护

spring-security-oauth2-autoconfigure  -> 自动配置,没有用处
spring-boot-starter-oauth2-client -> 最新
spring-boot-starter-oauth2-resource-server  -> 最新
spring-cloud-starter-oauth2 -> 引用 spring-security-oauth2,但尚未标注被废弃
建表语句: 官方SQL地址:https://github.com/spring-projects/spring-security-oauth/blob/main/spring-security-oauth2/src/test/resources/schema.sql
和Oauth2有关有6张表,oauth_client_details表就是保存 Oauth2客户端账号密码、授权、回调地址等重要信息的表,其他的表都是存储令牌、code,刷新令牌等信息。
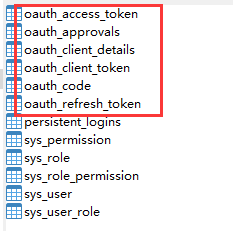 表结构说明:
- oauth_client_details 客户端账号密码、授权、回调地址等重要信息;核心表
- oauth_access_token 存储access_token
- oauth_refresh_token 存储refresh_token
- oauth_client_token 存储从服务端获取的token数据
- oauth_code 存储授权码
- oauth_approvals 存储授权成功的客户端信息
oauth_client_details核心表字段说明: 
下面我们搭建一个简单的 Spring Security + OAuth2.0微服务项目。
环境:
- jdk14
- Spring boot 2.3.6.RELEASE
- Spring Cloud Hoxton.SR9
- mysql 8
引入依赖:
    UTF-8
    14
    14
    Hoxton.SR9


    org.springframework.boot
    spring-boot-starter-parent
    2.3.6.RELEASE


        org.springframework.cloud
        spring-cloud-dependencies
        ${spring-cloud.version}
        pom
        import
1)引入依赖:
      org.springframework.boot
      spring-boot-starter-web


      org.springframework.boot
      spring-boot-starter-security


      org.springframework.cloud
      spring-cloud-starter-netflix-eureka-server
2)yml配置文件:
server:
  port: 18090
  servlet:
    context-path: /

spring:
  application:
    # 服务实例名
    name: EUREKA-SERVER
  security:
    user:
      name: admin
      password: 1qaz2wsx

eureka:
  instance:
    # 服务主机名称
    hostname: localhost
  client:
    service-url:
      defaultZone: http://admin:1qaz2wsx@${eureka.instance.hostname}:18090/eureka/
3)SpringSecurity配置类:
@EnableWebSecurity
public class WebSecurityConfig extends WebSecurityConfigurerAdapter {

	@Override
	protected void configure(HttpSecurity http) throws Exception {
		http.csrf().ignoringAntMatchers("/eureka/**");
		super.configure(http);
	}
}
4)启动类:
@SpringBootApplication
@EnableEurekaServer
public class EurekaServerApplication {
	public static void main(String[] args) {
		SpringApplication.run(EurekaServerApplication.class, args);
	}
}
认证授权服务只有一个。 1)引入依赖:
      org.springframework.boot
      spring-boot-starter-web


      org.springframework.boot
      spring-boot-starter-security


      org.springframework.cloud
      spring-cloud-starter-oauth2


      mysql
      mysql-connector-java
      8.0.23


      org.mybatis.spring.boot
      mybatis-spring-boot-starter
      2.1.0


      javax.xml.bind
      jaxb-api
      2.3.1


      com.sun.xml.bind
      jaxb-impl
      2.3.0


      com.sun.xml.bind
      jaxb-core
      2.3.0


      javax.activation
      activation
      1.1.1


      org.springframework.cloud
      spring-cloud-starter-netflix-eureka-client
2)yml配置文件:
server:
  port: 18091

# jsp配置
spring:
  application:
    # 服务实例名,每个服务名必须唯一
    name: OAUTH-SERVER
  datasource:
    driver-class-name: com.mysql.cj.jdbc.Driver
    url: jdbc:mysql://localhost:3306/security_authority?useUnicode=true;characterEncoding=utf8;useSSL=true;serverTimezone=GMT
    username: root
    password: 123456
    main:
      allow-bean-definition-overriding: true #允许我们自己覆盖spring放入到IOC容器的对象

# mybatis配置
mybatis:
  configuration:
    map-underscore-to-camel-case: true
  mapper-locations: classpath:mybatis/mapper/*.xml

logging:
  level:
    com.charge.learn.springsecurity.oauth2.parent.oauth.dao: debug

eureka:
  instance:
    # 服务主机名称
    hostname: localhost
  client:
    service-url:
      defaultZone: http://admin:1qaz2wsx@${eureka.instance.hostname}:18090/eureka/
3)启动类:
@SpringBootApplication
@MapperScan("com.charge.learn.springsecurity.oauth2.parent.oauth.dao")
@EnableEurekaClient
public class OAuthServerApplication {

    public static void main(String[] args) {
        SpringApplication.run(OAuthServerApplication.class, args);
    }
}
同认证服务类同。资源服务可以创建多个。
在搭建过程中,遇到不少问题,比如:
- jdk9 以上,会报错 javax.xml.bind 少包。
- Spring Cloud Eureka配置安全验证时Client注册报错:Cannot execute request on any known serve
解决问题的过程中也了解不少知识,关于 Spring Security + OAuth2.0的配置项,后面接着搞。
启动项目ok。 
– 求知若饥,虚心若愚。

