进程被杀死无非就是由于系统内存过低,并且进程的优先级比较低,所以才会被系统kill掉,想要进程保活必须提高进程的优先级。
为什么引入LMK?进程的启动分冷启动和热启动,当用户退出某一个进程的时候,并不会真正的将进程退出,而是将这个进程放到后台,以便下次启动的时候可以马上启动起来,这个过程名为热启动,这也是Android的设计理念之一。这个机制会带来一个问题,每个进程都有自己独立的内存地址空间,随着应用打开数量的增多,系统已使用的内存越来越大,就很有可能导致系统内存不足。为了解决这个问题,系统引入LowmemoryKiller(简称lmk)管理所有进程,根据一定策略来kill某个进程并释放占用的内存,保证系统的正常运行
LMK基本原理:所有应用进程都是从zygote孵化出来的,记录在AMS中mLruProcesses列表中,由AMS进行统一管理,AMS中会根据进程的状态更新进程对应的oom_adj值,这个值会通过文件传递到kernel中去,kernel有个低内存回收机制,在内存达到一定阀值时会触发清理oom_adj值高的进程腾出更多的内存空间:
LMK杀进程标准:内存阈值在不同的手机上不一样,一旦低于该值,Android便开始按顺序关闭进程. 因此Android开始结束优先级最低的空进程,即当可用内存小于180MB(46080)
查看进程的adj值:/proc//oom_adj 或者 /proc//oom_score_adj
内存阈值在不同的手机上不一样,一旦低于阈值,Android就会杀死对应优先级的进程,例如:当内存小于315MB(80640),就会杀死空进程。我们可以通过adb shell后输入`cat /sys/module/lowmemorykiller/parameters/minfree`来查看阈值,如下图所示(阈值的单位是4KB):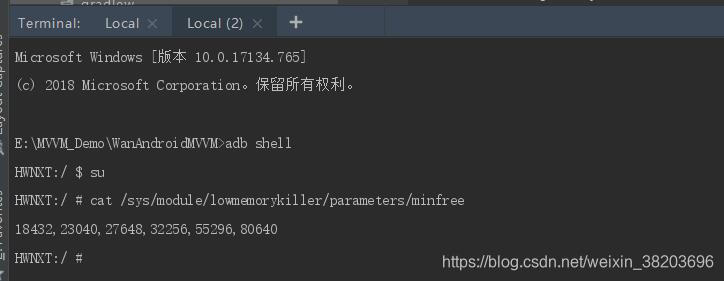
第一个值:18432(72MB)当阈值达到这个值时候,前台进程就会被杀死;
第二个值:23040(90MB)当阈值达到这个值的时候,可见进程就会被杀死;
第三个值:27648(108MB)当阈值达到这个值的时候,服务进程会被杀死;
第四个值:32256(126MB)当阈值达到这个值的时候,后台进程会被杀死;
第五个值:55296(216MB)当阈值达到这个值的时候,ContentProvider会被杀死;
第六个值:80640(315MB)当阈值达到这个值的时候,空进程会被杀死。
如何判断进程优先级?
- 红色部分是容易被回收的进程,属于android进程
- 绿色部分是较难被回收的进程,属于android进程
- 其他部分则不是android进程,也不会被系统回收,一般是ROM自带的app和服务才能拥有
通过oom_adj的值,判断进程的优先级,不同的手机的oom_adj的值可能不一样。oom_adj值越小,优先级越高,也就也难被杀死,我们日常开发的APP最高能达到的值是0,即前台进程。oom_adj的值我们可以通过 adb shell 直接输入cat /proc/你的process ID/oom_adj来获取(有一个前提,手机必须是root过的才能获取到值)
完整项目地址:https://github.com/buder-cp/base_component_learn/tree/master/performanceOPT/buderdn14
方式一:activity提权保活原理:
- 监控手机锁屏解锁事件,在屏幕锁屏时启动1个像素透明的 Activity,在用户解锁时将 Activity 销毁掉,从而达到提高进程优先级的作用。
代码实现:
- 创建1个像素的Activity:KeepActivity
public class KeepActivity extends Activity {
    private static final String TAG = "KeepActivity";

    @Override
    protected void onCreate(@Nullable Bundle savedInstanceState) {
        super.onCreate(savedInstanceState);
        Log.e(TAG, "启动Keep");
        Window window = getWindow();
        //设置这个activity在左上角
        window.setGravity(Gravity.START | Gravity.TOP);
        WindowManager.LayoutParams attributes = window.getAttributes();
        //宽高为1
        attributes.width = 1;
        attributes.height = 1;
        //起始位置左上角
        attributes.x = 0;
        attributes.y = 0;
        window.setAttributes(attributes);

        KeepManager.getInstance().setKeepActivity(this);
    }
}- 创建广播接收者,当接收到亮屏或者息屏广播时启动我们的1像素activity:KeepReceiver
public class KeepReceiver extends BroadcastReceiver {
    private static final String TAG = "KeepReceiver";

    @Override
    public void onReceive(Context context, Intent intent) {
        String action = intent.getAction();
        Log.e(TAG, "receive:" + action);
        if (TextUtils.equals(action, Intent.ACTION_SCREEN_OFF)) {
            //灭屏 开启1px activity
            KeepManager.getInstance().startKeep(context);
        } else if (TextUtils.equals(action, Intent.ACTION_SCREEN_ON)) {
            //亮屏 关闭
            KeepManager.getInstance().finishKeep();
        }
    }
}- 创建广播注册管理单例类来启动或者关闭这个activity:KeepManager
    /**
     * 启动1个像素的KeepActivity
     *
     * @param context
     */
    public void startKeep(Context context) {
        Intent intent = new Intent(context, KeepActivity.class);
        intent.setFlags(Intent.FLAG_ACTIVITY_NEW_TASK);
        context.startActivity(intent);
    }

    /**
     * finish1个像素的KeepActivity
     */
    public void finishKeep() {
        if (null != mKeepActivity) {
            Activity activity = mKeepActivity.get();
            if (null != activity) {
                activity.finish();
            }
            mKeepActivity = null;
        }
    }
使用方式:在我们主应用打开时注册这个广播接收者,当应用在后台并且用户息屏后就会启动我们的activity,以提高我们应用进程的优先级,防止在后台被清除掉。
缺点:存在一个Activity不够干净,同时需要在锁屏才能监听到,如果用户一直处于亮屏状态,oom_adj的值不会变小,如果内存过小,进程会被杀死。
方式二:Service提权保活启动一个前台服务,从而拉高进程的优先级,提权是将应用的OMM提高,系统会认为我们是一个较高优先级的进程而防止应用被后台kill掉。
创建一个前台服务用于提高app在按下home键之后的进程优先级,startForeground(ID,Notification):使Service成为前台Service。 前台服务需要在通知栏显示一条通知。
使用前台服务在不同API上的差别:
- API leveL=18 & API level < 26:在需要提优先级的serviceA启动一个InnerService。两个服务都startForeground,且绑定同样的ID。stop掉InnerService,通知栏图标被移除
- API level >= 26:必须手动创建通知栏,无法移除通知栏图标startForegroundService()替代了startService()
在大于26版本后都有通知栏驻存,会提示到用户,因此这个service提权并不好用。
我们需要对不同API做适配:
public class ForegroundService extends Service {
    @Nullable
    @Override
    public IBinder onBind(Intent intent) {
        return null;
    }

    @Override
    public void onCreate() {
        super.onCreate();
        if (Build.VERSION.SDK_INT >= Build.VERSION_CODES.O) {
            NotificationChannel channel = new NotificationChannel("deamon", "deamon",
                    NotificationManager.IMPORTANCE_LOW);
            NotificationManager manager = (NotificationManager) getSystemService(Context.NOTIFICATION_SERVICE);
            if (manager == null)
                return;
            manager.createNotificationChannel(channel);

            Notification notification = new NotificationCompat.Builder(this, "deamon").setAutoCancel(true).setCategory(
                    Notification.CATEGORY_SERVICE).setOngoing(true).setPriority(
                    NotificationManager.IMPORTANCE_LOW).build();
            startForeground(10, notification);
        } else if (Build.VERSION.SDK_INT >= Build.VERSION_CODES.JELLY_BEAN_MR2) {
            //如果 18 以上的设备 启动一个Service startForeground给相同的id
            //然后结束那个Service
            startForeground(10, new Notification());
            startService(new Intent(this, InnnerService.class));
        } else {
            startForeground(10, new Notification());
        }
    }

    public static class InnnerService extends Service {

        @Override
        public void onCreate() {
            super.onCreate();
            startForeground(10, new Notification());
            stopSelf();
        }

        @Nullable
        @Override
        public IBinder onBind(Intent intent) {
            return null;
        }
    }
}
缺点:这种保活方式有一个缺点,就是在API > 26即8.0以上版本的通知栏隐藏不了。 OK,保活就讲到这里,下面我们将如何拉活进程。
方式三:广播拉活:Android在7.0之后对广播增加了一些限制,在8.0以后就更加严格了,现在接收系统广播的拉活方式基本上已经用不了了。
在发生特定系统事件时,系统会发出广播,通过在 AndroidManifest 中静态注册对应的广播监听器,即可在发生响应事件时拉活。但是从android 7.0开始,对广播进行了限制,而且在8.0更加严格。
目前可用的静态广播:https://developer.android.google.cn/guide/components/broadcast-exceptions.html
受 Android 8.0(API 级别 26)后台执行限制的影响,以 API 级别 26 或更高级别为目标的应用无法再在其清单中注册用于隐式广播的广播接收器。不过,有几种广播目前不受这些限制的约束。无论应用以哪个 API 级别为目标,都可以继续为以下广播注册监听器。官方提示:注意:尽管这些隐式广播仍在后台运行,但您应避免为其注册监听器。
列举几个被豁免的广播:
ACTION_LOCKED_BOOT_COMPLETED、ACTION_BOOT_COMPLETED:豁免的原因这些广播仅在首次启动时发送一次,而且许多应用需要接收此广播以调度作业、闹钟等。
ACTION_LOCALE_CHANGED:仅在语言区域发生更改时发送,这种情况并不常见。
ACTION_PACKAGE_DATA_CLEARED:仅在用户明确清除“设置”中的数据时,因此广播接收器不太可能对用户体验造成显著影响
ACTION_DEVICE_OWNER_CHANGED:此直播的发送频率不高;某些应用需要接收它来了解设备的安全状态已发生更改
可见,这些广播一般我们也用不太到,对于应用保活拉活已经基本没有什么实际意义。
方式四:“全家桶”拉活有多个app在用户设备上安装,只要开启其中一个就可以将其他的app也拉活。比如手机里装了手Q、QQ空间、兴趣部落等等,那么打开任意一个app后,其他的app也都会被唤醒。
这种方式除了大厂外,对于一般开发者的应用是没有参考价值的。
方式五:Service机制(Sticky)拉活将 Service 设置为 START_STICKY,利用系统机制在 Service 挂掉后自动拉活。
- START_STICKY:“粘性”。如果service进程被kill掉,保留service的状态为开始状态,但不保留递送的intent对象。随后系统会尝试重新创建service,由于服务状态为开始状态,所以创建服务后一定会调用onStartCommand(Intent,int,int)方法。如果在此期间没有任何启动命令被传递到service,那么参数Intent将为null。
- START_NOT_STICKY:“非粘性的”。使用这个返回值时,如果在执行完onStartCommand后,服务被异常kill掉,系统不会自动重启该服务。
- START_REDELIVER_INTENT:重传Intent。使用这个返回值时,如果在执行完onStartCommand后,服务被异常kill掉,系统会自动重启该服务,并将Intent的值传入。
- START_STICKY_COMPATIBILITY:START_STICKY的兼容版本,但不保证服务被kill后一定能重启。
只要 targetSdkVersion 不小于5,就默认是 START_STICKY。 但是某些ROM 系统不会拉活。并且经过测试,Service 第一次被异常杀死后很快被重启,第二次会比第一次慢,第三次又会比前一次慢,一旦在短时间内 Service 被杀死4-5次,则系统不再拉起。
public class StickyService extends Service {
    @Nullable
    @Override
    public IBinder onBind(Intent intent) {
        return null;
    }

    @Override
    public int onStartCommand(Intent intent, int flags, int startId) {
        return super.onStartCommand(intent, flags, startId);
    }
}
上面就是默认是Start_Sticky服务。
方式六:账户同步拉活账户同步这篇文章讲的比较全面:账户同步拉活在此我就不作多讲了;
利用账号同步机制拉活,不过貌似被改了,失效了
方式七:JobScheduler拉活JobScheduler允许在特定状态与特定时间间隔周期执行任务。可以利用它的这个特点完成保活的功能,效果即开启一个定时器,与普通定时器不同的是其调度由系统完成。
创建一个JobService:注意setPeriodic方法在7.0以上如果设置小于15min不起作用,可以使用setMinimumLatency设置延时启动,并且轮询。
- 第一步:创建MyJobService实现JobService,如:
@SuppressLint("NewApi")
public class MyJobService extends JobService {
    private static final String TAG = "MyJobService";

    public static void startJob(Context context) {
        JobScheduler jobScheduler = (JobScheduler) context.getSystemService(
                Context.JOB_SCHEDULER_SERVICE);
        JobInfo.Builder builder = new JobInfo.Builder(10,
                new ComponentName(context.getPackageName(),
                        MyJobService.class.getName())).setPersisted(true);
        /**
         * I was having this problem and after review some blogs and the official documentation,
         * I realised that JobScheduler is having difference behavior on Android N(24 and 25).
         * JobScheduler works with a minimum periodic of 15 mins.
         *
         */
        if (Build.VERSION.SDK_INT >= Build.VERSION_CODES.N){
            //7.0以上延迟1s执行
            builder.setMinimumLatency(1000);
        }else{
            //每隔1s执行一次job
            builder.setPeriodic(1000);
        }
        jobScheduler.schedule(builder.build());
    }

    @Override
    public boolean onStartJob(JobParameters jobParameters) {
        Log.e(TAG,"开启job");
        //7.0以上轮询
        if (Build.VERSION.SDK_INT >= Build.VERSION_CODES.N){
            startJob(this);
        }

        return false;
    }

    @Override
    public boolean onStopJob(JobParameters jobParameters) {
        return false;
    }
}- 第二步:在清单中注册MyJobService
- 第三步:手动开启JobSchedule,在activity的oncreate方法中启动Service
MyJobService.startJob(this);
根据终端不同,在小米手机(包括 MIUI)接入小米推送、华为手机接入华为推送。
方式九:Native拉活Native fork子进程用于观察当前app主进程的存亡状态。对于5.0以上成功率极低。
方式十:双进程守护两个进程共同运行,如果有其中一个进程被杀,那么另外一个进程就会将被杀的进程重新拉起
双进程守护本质上是开启两个服务,一个本地服务和一个远程服务,当其中一个服务被杀死时,另一个服务会自动的把被杀死的那个服务拉活。
- 第一步:创建一个空的AIDL文件
interface IMyAidlInterface {
    /**
     * Demonstrates some basic types that you can use as parameters
     * and return values in AIDL.
     */
    void basicTypes(int anInt, long aLong, boolean aBoolean, float aFloat,
            double aDouble, String aString);
}
- 2、创建本地LocalService和远程RemoteService
LocalService.java:
public class LocalService extends Service {
    private MyBinder myBinder;

    class MyBinder extends IMyAidlInterface.Stub{

        @Override
        public void basicTypes(int anInt, long aLong, boolean aBoolean, float aFloat,
                               double aDouble, String aString) throws RemoteException {

        }
    }
    @Nullable
    @Override
    public IBinder onBind(Intent intent) {
        return myBinder;
    }

    @Override
    public void onCreate() {
        super.onCreate();
        myBinder = new MyBinder();
        if (Build.VERSION.SDK_INT >= Build.VERSION_CODES.O) {
            NotificationChannel channel = new NotificationChannel("deamon", "deamon",
                    NotificationManager.IMPORTANCE_LOW);
            NotificationManager manager = (NotificationManager) getSystemService(
                    Context.NOTIFICATION_SERVICE);
            if (manager == null)
                return;
            manager.createNotificationChannel(channel);

            Notification notification = new NotificationCompat.Builder(this,
                    "deamon").setAutoCancel(true).setCategory(
                    Notification.CATEGORY_SERVICE).setOngoing(true).setPriority(
                    NotificationManager.IMPORTANCE_LOW).build();
            startForeground(10, notification);
        } else if (Build.VERSION.SDK_INT >= Build.VERSION_CODES.JELLY_BEAN_MR2) {
            //如果 18 以上的设备 启动一个Service startForeground给相同的id
            //然后结束那个Service
            startForeground(10, new Notification());
            startService(new Intent(this, InnnerService.class));
        } else {
            startForeground(10, new Notification());
        }
    }

    @Override
    public int onStartCommand(Intent intent, int flags, int startId) {
        bindService(new Intent(this, RemoteService.class), new MyServiceConnection(),
                BIND_AUTO_CREATE);
        return super.onStartCommand(intent, flags, startId);
    }

    private class MyServiceConnection implements ServiceConnection {

        @Override
        public void onServiceConnected(ComponentName componentName, IBinder iBinder) {
            //回调

        }

        @Override
        public void onServiceDisconnected(ComponentName componentName) {
            //
            startService(new Intent(LocalService.this, RemoteService.class));
            bindService(new Intent(LocalService.this, RemoteService.class), new MyServiceConnection(),
                    BIND_AUTO_CREATE);
        }
    }

    public static class InnnerService extends Service {

        @Override
        public void onCreate() {
            super.onCreate();
            startForeground(10, new Notification());
            stopSelf();
        }

        @Nullable
        @Override
        public IBinder onBind(Intent intent) {
            return null;
        }
    }
}
RemoteService.java:
public class RemoteService extends Service {
    private MyBinder myBinder;

    class MyBinder extends IMyAidlInterface.Stub {

        @Override
        public void basicTypes(int anInt, long aLong, boolean aBoolean, float aFloat,
                               double aDouble, String aString) throws RemoteException {

        }
    }

    @Nullable
    @Override
    public IBinder onBind(Intent intent) {
        return myBinder;
    }

    @Override
    public void onCreate() {
        super.onCreate();
        myBinder = new MyBinder();
        if (Build.VERSION.SDK_INT >= Build.VERSION_CODES.O) {
            NotificationChannel channel = new NotificationChannel("deamon", "deamon",
                    NotificationManager.IMPORTANCE_LOW);
            NotificationManager manager = (NotificationManager) getSystemService(
                    Context.NOTIFICATION_SERVICE);
            if (manager == null)
                return;
            manager.createNotificationChannel(channel);

            Notification notification = new NotificationCompat.Builder(this,
                    "deamon").setAutoCancel(true).setCategory(
                    Notification.CATEGORY_SERVICE).setOngoing(true).setPriority(
                    NotificationManager.IMPORTANCE_LOW).build();
            startForeground(10, notification);
        } else if (Build.VERSION.SDK_INT >= Build.VERSION_CODES.JELLY_BEAN_MR2) {
            //如果 18 以上的设备 启动一个Service startForeground给相同的id
            //然后结束那个Service
            startForeground(10, new Notification());
            startService(new Intent(this, InnnerService.class));
        } else {
            startForeground(10, new Notification());
        }
    }

    @Override
    public int onStartCommand(Intent intent, int flags, int startId) {
        bindService(new Intent(this, LocalService.class), new MyServiceConnection(),
                BIND_AUTO_CREATE);
        return super.onStartCommand(intent, flags, startId);
    }

    private class MyServiceConnection implements ServiceConnection {

        @Override
        public void onServiceConnected(ComponentName componentName, IBinder iBinder) {

        }

        @Override
        public void onServiceDisconnected(ComponentName componentName) {
            startService(new Intent(RemoteService.this, LocalService.class));
            bindService(new Intent(RemoteService.this, LocalService.class),
                    new MyServiceConnection(), BIND_AUTO_CREATE);
        }
    }

    public static class InnnerService extends Service {

        @Override
        public void onCreate() {
            super.onCreate();
            startForeground(10, new Notification());
            stopSelf();
        }

        @Nullable
        @Override
        public IBinder onBind(Intent intent) {
            return null;
        }
    }
}- 第三步:在清单文件中注册服务
- 第四步:在Activity中的onCreate方法开启两个服务
 startService(new Intent(this, LocalService.class));
 startService(new Intent(this, RemoteService.class));
我们还可以利用上面的JobSchedule 进一步保活我们的进程
public class MyJobService extends JobService {
    private static final String TAG = "MyJobService";

    @Override
    public boolean onStartJob(JobParameters jobParameters) {
        Log.e(TAG, "onStartJob");
        if (Build.VERSION.SDK_INT < Build.VERSION_CODES.N) {
            startJob(this);
        }
        boolean isLocalRun = isServiceRunning(this, LocalService.class.getName());
        boolean isRemoteRun = isServiceRunning(this, RemoteService.class.getName());
        if (!isLocalRun || !isRemoteRun) {
            startService(new Intent(this, LocalService.class));
            startService(new Intent(this, RemoteService.class));
        }

        return false;
    }

    @Override
    public boolean onStopJob(JobParameters jobParameters) {
        return false;
    }

    public static void startJob(Context context) {
        JobScheduler jobScheduler = (JobScheduler) context.getSystemService(Context.JOB_SCHEDULER_SERVICE);
//        setPersisted 在设备重启依然执行
        JobInfo.Builder builder = new JobInfo.Builder(8, new ComponentName(context
                .getPackageName(), MyJobService.class.getName())).setPersisted(true);
        //小于7.0
        if (Build.VERSION.SDK_INT < Build.VERSION_CODES.N) {
            builder.setPeriodic(1000);
        } else {
            builder.setMinimumLatency(1000);
        }
        assert jobScheduler != null;
        jobScheduler.schedule(builder.build());
    }

    /**
     * 判断服务是否开启
     *
     * @return
     */
    public static boolean isServiceRunning(Context context, String ServiceName) {
        if (TextUtils.isEmpty(ServiceName)) {
            return false;
        }
        ActivityManager myManager = (ActivityManager) context.getSystemService(Context.ACTIVITY_SERVICE);
        ArrayList runningService = (ArrayList) myManager.getRunningServices(1000);
        for (int i = 0; i < runningService.size(); i++) {
            Log.i("服务运行1:",""+runningService.get(i).service.getClassName().toString());
            if (runningService.get(i).service.getClassName().toString().equals(ServiceName)) {
                return true;
            }
        }
        return false;
    }


}
开俩个进程相互唤起,因为系统的进程回收机制是一个个回收的,利用这个时间差来相互唤起,当一个进程被磨灭掉,另一个马上重启,缺点是现在大部分机型只要一键清理就玩完了,不过也没有更好的办法,而且8.0之后对这个做了限制,想要在一个后再服务中启动另一个服务会报错,可以用startForegroundService方法,但是会有一个通知在通知栏,这就有点不太友好了,不过介于8.0以下手机还有很多,可以考虑
完整地址
总结:进程保活和拉活的方案到这里就结束了,随着谷歌公司对Android的安全机制做的越发的好,想要永久保活是完全不可能的,除非我们的APP可以跟一些手机厂商合作添加到白名单中才能实现永久保活, 另外系统会优先杀死占用内存多的应用,所以想让自己的APP活的更久,还可以从性能的角度上去优化,让其尽可能少的占用内存。如果有说的不对的地方可以评论指出错误的地方,谢谢!